|
Guinea Pig Crafts
This page will certainly be a "work in progress". I hope to be adding ideas and information soon. If you have a Guinea Pigs themed Craft you would like to share here, send it to me with GUINEA PIG CRAFT as the subject line. I will need photos of the craft and would like to have a photo of your Guinea Pig with your first name to credit you for the craft.
CROCHETED GUINEA PIG SIZE CLOSED TUNNEL FOR AN AGILITY COURSE 
This craft item was the creation of and was submitted by: Marna Kazmaier
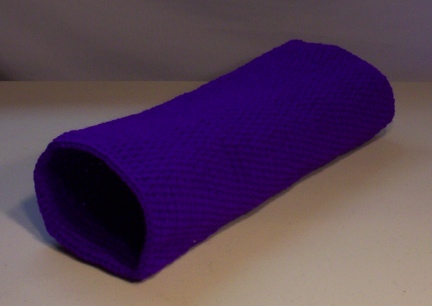
As is the Crocheted Open Tunnel, this is easy to make, but takes a few hours to complete. When finished this Closed Tunnel will be machine or hand washable, air dry. You may use a chosen color or yard new from the store, or grab all those little left over balls of yarn and create a fun colored Closed Tunnel for your Guinea Pig.
Using an I size Crochet Hook, chain 55. Loop or link the two ends together. Crochet a 1 1/2 stitch in each link looping/linking them at the end. From there, do rounds of taught stitches for about 2 1/2" to 4". This end will remain open for the Guinea Pig to go through. You want the stitches taught so that the area will be stiffer to form the open circle.
Chain two and continue the round and round but now with a Double Stitch adding a stitch to the Tunnel every so often (preferably every 35 - 40 stitches) until the Closed Tunnel is approx. 15" long. These double stitches do not need to be made as taught as the first 1 1/2 stitches were. Your last three stitches will be a first a 1 1/2 stitch, then a regular stitch, followed by and lastly a slip stitch. Then tie off and pull a short amount of yard from the knot into the weave hiding the end piece.
You could also make this same Open Tunnel another way. Crochet a chain as long as you would like for the Tunnel to be. Crochet a 1 1/2 stitch in each chain. Crochet the piece to the size you would like the Tunnel to be around. I would suggest approx 15" - 17". Fold over and stitch each side together with a slip stitch.
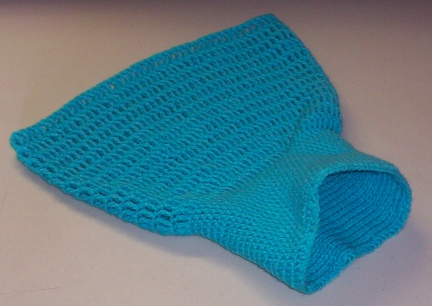
The Turquoise Closed Tunnel shown here in the photo was made with Triple Stitches for the Closed End. I did the Triple Stitches in rows, chaining 3 after looping into each of the ends as I crocheted. This Tunnel could also be used for Ferret Agility.
CROCHETED GUINEA PIG SIZE OPEN TUNNEL FOR AN AGILITY COURSE 
This craft item was the creation of and was submitted by: Marna Kazmaier
This is an easy to make/crochet Open Tunnel. You might use a chosen color new from the store, or use up all those little balls of yarn that have been sitting around waiting for a craft to come up for use.
Using an I size Crochet Hook chain 55. Loop/link together at the ends making sure your chain in straight. Crochet a 1 1/2 stitch in each of the chain links. You want these stitches taught/tight s that when the Open Tunnel is set up on the table, it will have "body" to it and stand open. Hook or loop the two ends together again, then just keep crocheting 1 1/2 stitches round and round for a few hours until the Tunnel is approx. 15" in length. Your last two stitches will be a regular stitch followed by and lastly a slip stitch. After you knot your end weave the end short piece of yarn into the tunnel hiding the yard.
This will make an Open Tunnel for your Guinea Pig that you can set open on the table for the Guinea Pig to come through. The Crocheted open Tunnel will be machine washable, set out to air dry. You will be able to fold this open Tunnel for storage.
WOODEN BEAD AND BELL CAGE TOY This craft item was the creation of and was submitted by: Marna Kazmaier
You will need:
Approx. 6" - 8" of wire from a clothes hanger or wire that is about that thick. Thin wire could be unsafe for your GP.
Enough wooden beads to fill the wire for the toy. If painted, make sure that they paint is child safe. If you use old painted wooden beads they may contain lead and be toxic to your pets.
A metal bell, dome or Christmas type for the bottom of the toy
You might want a clip or snap to attach to the side of your Pet's cage.
Using a pair of pliers make a hoop in one end of the wire. You can make the hoop with a small opening to it so that you can just dangle it through the cage or you can use a closed loop and a very small snap/clip to attach to the side of the cage for your pet.
String your beads unto your wire until there is about 1" of wire left. Add your bell here. Make a loop that is tight, ie, that is closed, the end of the wire now touches the wire that the beads and bell are strung on. Your loop should not be tight. The bell should move a bit so that it rings when played with.
Hang your new toy in the cage with your pet and enjoy the bell ringing throughout your home, showing that your GP loves the new toy you have made for it.
This craft item was the creation of and was submitted by: Marna Kazmaier
This is a fun, money saving craft that your Guinea Pig will enjoy. Just find a cardboard box with or without a bottom and cut a hole in the side, two sides if you like, for the GP to go in and out of. Set it in your GP's cage and watch your GP go in and out. You can decorate the box if you like with safe children's paint and or safe children's glue. Using the safe glue, glue on little pieces of balled up tissue paper making your GP Hut look like a Pinata. But the truth is, your GP will not care if it's new hut is decorated or not.
This craft item was the creation of and was submitted by: Marna Kazmaier
For this craft you will need:
A small cardboard box or a piece of cardboard to fold into a smaller box
scissors
wrapping paper (child safe) and or newspaper print
child safe glue
small fun treats and or a small amount of fresh hay
Use of make a small box. Add a few, just a couple, treats for your Guinea Pig. You do not want to fill the box with treats. Once it is opened the GP will eat the treats and you do not want it to have a box full all at once. Add a small amount of fresh hay. Close the lid of the box and wrap the box with either child safe wrapping paper or newsprint. Using a small amount of child safe glue seal the paper around the box as you would wrap a gift for a friend...using glue rather then tape. Let dry overnight. Set this box into your GP's cage next to it's feed bowl. Step back and watch. Don't be tooooo surprised if the GP does not go to the box right away. But it will. Don't be too surprised if some GPs use the box for a toy for a while before opening it. Be patient. Let the GP enjoy the box all by it's self.
You can also cut or use a paper punch to put holes into the box before closing. Just make sure your treats are larger then the holes or they will all fall out. If you are putting hay into a box with holes, poke a bit through the holes so that the GP see the hay coming out.
The contents of this page for Guinea Pig Crafts is still under construction. Please check back later!
-- The Guinea Pig Agility Team
| 


 In the high plains of South Dakota, USA
 In the high plains of South Dakota, USA